Thursday, December 31, 2009

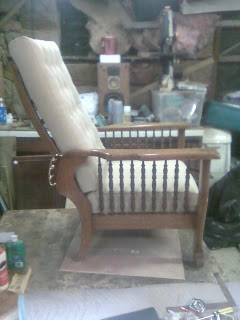
Completed Morris Chair

Here are a few photos of the Morris chair I wrote about in previous entries. If you click on the "Morris" link in the Labels Column to the right you can see the previous entries on the restoration process. the chair has diamond tufting on the back cushion in keeping with the style of cushion for these chairs.Below are the photos of the chair with the cushions.


Tuesday, December 29, 2009

American Empire Pedestal table (ca. 1840-50)

The history of this pedestal table was discussed in an earlier post. The main problems it has are loose veneer and some damage to the finish of the top. Because of the extent of the damage the finish had to be removed on the top. The finish on the base will be restored. Below are some photos of the removal of the finish and the repair to the veneer of the base.
The table as it came to me. The white marks are rings which have eaten through the finish.The removal of the finish from the top. The base has been masked off to prevent damage to the finish.The table wit the finish removed. The light color is mostly due to the angle of the photo.Repairs to the veneer on the base.

American Empire Two Drawer stand (ca.1840-50)

In a previous post I detailed the history of these pieces. This "Pillar and Scroll" table has severe damage due to a moving accident as well as veneer missing from age. The reason veneer loosens with age is that the veneer wood moves due to moisture at a different rate than the secondary wood it is glued to. in addition, the grain is often going in different directions so that the veneer pops off as the glue gives way. In this instance, the veneer was asked to bend around a foot that caused stress on the veneer and as the glue gave up the veneer chipped off. Below are several photos of the veneer damage and its repair. once the veneer is patched then the patches will be toned and blended to match the existing veneer. The photos following the veneer patches are of the top after the gouges had been repaired and sanded.
The veneer damage. Everything under the scribed line will be patched.The secondary wood cleaned and ready for the patch.The Veneer patch. After it has been glued it will be trimmed to the shape of the scroll foot.More veneer damage.The areas of this damage ready to be patched.The veneer patches after the gluing process.Gluing veneer patches in place.The Damage to the curved section of a scroll foot.Another scroll foot with veneer damage. Again, everything below the scribed line will be patched.Patching a scroll foot.The top after it has been repaired of the gouges and sanded. The natural color was a bit lighter then the leaves.The leaves after they have been repaired and sandedThe top stained to match the leaves.The top and the leaves ready for finish.

Two Pillar and Scroll Tables (ca. 1840- 1850)

I received two tables which I have started working on. Both are of the Pillar and Scroll style. The first is a two drawer drop leaf stand and the second is a pedestal table. I thought that before jumping into the repair aspect of these pieces that I would write a bit about their history.

Most of the dates that and specific information that I am going to relate comes from an article I found online concerning this furniture. If you are interested you can follow the link below to the article:


for all of the time that I have been a cabinetmaker I have referred to these pieces as American Empire. Recently while researching another piece I came across this term of "Pillar and Scroll".

The "Pillar" referred to is the pillar that supports the top of the table while the "Scroll" referred to is the scroll patten used to terminate the feet on many of these pieces. While many pieces have these features, the key characteristic is the use of tight grained crotch Mahogany veneer to create repeating patterns that decorate the piece. This is usually the sole means of decoration
on a piece.

The reason for this type of construction is that by the 1840's furniture manufacture had moved into a quasi mass production setting for the first time. While the joinery was still done by hand, the sawing of the wood and veneers was starting to be done by with the help of machines. The curvilinear designs for these pieces utilised the band saw to cut the initial shapes out of a secondary wood, usually pine or poplar. These shapes were cut from large stacked blanks or assembled from hollow forms. The shapes, once cut and sanded were veneered. The result was decoration which was relatively easy to produce and repeat. It was also inexpensive to produce. Only in the higher end pieces do you find carving for ornamentation. Turnings were sometimes used as well for ornamentation but overall it was the simplified veneer decoration which dominated this style.

While I use the term pillar and scroll the proper categorisation of these pieces would be Late Empire or Late Classical. I like the use of Pillar and Scroll because it properly identifies these pieces. This being said, these pieces have design elements taken from the American Empire movement in furniture and fall within this category.

The drop leaf table as it came to me was severely damaged by movers and was disassembled and badly gouged on the top. The Pedestal table was in better condition and but needed veneer work done as well as having he top refinished. below are some photos of the pieces as they came to me I will follow this up by individual posts concerning the repairs.

The drop leaf two drawer standDamage to the top of the stand.A close up of the damage.The Pedestal table.Damage to the top of the pedestal table.

Thursday, December 24, 2009

Transitional Rococo - Renaissance revival 7 pc. Parlor Set Part 2

For a look at part one of this entry, here is a link:

The next step in the process of restoring these chairs was to make all of the repairs to the frames. Most of this involved fine tuning repairs made previously by another restorer. In addition there were many cosmetic repairs to make and also loose veneer to glue down. I also included some photos of a small patch put in on the settee. Below are photos of all of these repairs.
Gluing down loose veneer on the seat frame.
More loose Veneer.

These two chairs are having loose veneer glue down. If you look closely you can see little pieces of blue masking tape on each chair. Each piece of tape marks a place where the chairs need cosmetic repair.
Gluing a patch in place on the settee.
The patch once it had dried in place.
A photo of the patch after it has been carved and sanded.

Two Caned Chairs

The two chairs in this entry came to me in need of new caned seats. No finish work or repair was needed but the customer did ask for the new cane to be toned to look oxidized. The photos below are of the process of toning the cane. This is done with a stain in an aerosol container which is applied to the cane. After the Stain has dried thoroughly then a clear coat of Shellac in an aerosol container is applied to seal in the stain.

On a side note, I am always amazed in this business how pieces come in waves. I will get several jobs including caning at the same time for example. In this case though, I looked on the bottom of one of the chairs and found a tag that read Grand Ledge, MI. This is the same town where the Crawford Chairs in a recent entry came from. These chairs were probably made by the Crawford Chair Company or by the Grand Ledge Chair Company, of which Crawford was an off shoot.

In this photo the chairs are seen with the new cane before it has been stained.
After masking of the chairs I applied the stain followed by a clear coat of shellac to seal the stain in.Here is a photo of the chairs with the new cane toned to look oxidized.

Friday, December 18, 2009

Custom American Girl Doll Bunk Beds Part 2

Here are a few pictures of the completion of the bunk beds. At the end of the post are a few photos of the beds with finish on them. One advantage to using French Polish for a finish on children's toys is that it is the safest finish for children. In fact, the largest use of shellac in the world is for the food industry.

Gluing the bed supports on the side rails.The Ladder gluing up.The beds completed ans sanded ready for finish.The bed disassembled during the finishing process.The completed beds.

Crawford Quarter Sawn Oak Chairs (ca.1902-1920) Part 2

Here are a few pictures of the Crawford chairs reassembled and with the new cane in place. The seats will yellow overtime due to oxidation. The nice thing about leaving cane seats natural versus staining them is that they last longer.

Tuesday, December 15, 2009

Custom American Girl Doll Bunk Beds

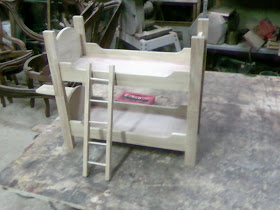
About a month ago I sent an email to my customers to see if anyone was interested in custom objects like turnings or carvings for Christmas. One of the responses was from a customer who wanted some bunk beds made for her daughters American Girl Doll. Below are some photos of the process of making the beds. I decided to build them out of Locust which is a local hard wood.The inner measurements for the beds are roughly 8" x 18". I will post a second post when they are completed.
Here is a photo of the board I used for the parts before it was milled.
Gluing up the boards that will become the head board and foot board.The various parts milled and cut to size.Gluing up the head boards and foot boards.The frames for the beds assembled.Like real beds the rails will be detachable from the head and foot boards.The beds in bunk positions.