Before moving on to the restoration of this desk, It is worth noting that not only has it retained it's original parts (for the most part), it has also maintained it's original surfaces. Because of this a lot of information can be gathered about how it was made. In addition, there are several other clues found upon close inspection that create a rich history for this piece.
When I looked closely at the inner surfae of the desk lid I noticed that the surface was uneven and scalloped. This is the tale tell sign of the marks left from a Fore Plane. A Fore Plane was a plane about 18 inches in length that had a slightly convex blade. The Fore Plane was used as the first in a series of planes in the dimensioning of lumber. The convex blade meant that material could be removed quickly , and was later refined with smoothing planes. Secondary surfaces on furniture were often left at this first stage because there was no need to make the insides and backs of cabinets as nice as the outside. What is interesting is how certian surfaces on this piece are smoothed but that the desk lid is left a little rough. You can even see the chatter marks left by the plane! Perhaps, by leaving the surface a little rough, the contents on the desk lid would be less likely to roll off. Below is a photo of a Fore Plane. The planes used by cabinet makers during this time were all wooden.
 Another plane used to create this piece was the Rabbit Plane, the rabbit plane was use to create the deep cuts where a board fit into another board, or the inside edges of the desk lid. Here is a photo of a 19th century rabbit plane:
 Other tools used would have been a series of chisels and saws. the chisels would have been used for creating the dovetail joinery in the drawer and the saws to rip and cross cut the boards. The entire piece is held together with cut nails. Here is a nice image of the 19th century Jointer at work. He may even be using a Fore Plane in the picture! In this case, his name was Lewis Miller from York, Pennsylvania.This drawing dates to around 1810. While this is not the man who created this desk, it is pretty close to the idea!
 The other aspect of this piece that interests me is that it appears to be made from another piece of furniture. The front right leg has a mitered notch removed from it which seems to be there for a reason, likewise the upper left side has two holes filled in that look like holes for a drawer pull. It is conceivable that parts were taken from another piece. It would be far easier to use old wood rather than going through the effort of milling new lumber. It is also apparent that while this piece was not refinished at any time, I did find evidence of at least two different repair sessions during its life. One in the late 19th century (newer cut nails were used) and one in the early 20th Century (newer round nails were used and boards cut on a circular saw). Some of the repairs I made to this piece were an attempt to fix some poorly made repairs, giving the piece a original, but usable appearance.
After all that history it is time to see the desk! below are two photos of the desk as it came to me.

 One of the first things I did was to remove the locks. They hadn't been used in quite some time! The first picture shows the lock stuffed with lint, etc. the second shows the lock after it was cleaned. I later made a key using a 19th century key blank to work both of the locks for the desk.
 To repair the inner parts of the desk, I needed to remove the back. The back was falling off anyway and was integral to the structure of the piece, so I needed to reset the nails so that it was attached firmly. This was done after all the repairs were made. Here is a photo of the collection of Cut Nails I found in the back. They varied in age and design.
 Once the back was removed I needed to fabricate a guide board for one of the lid supports. I had one to use as a template so I made the second based on the first. One of the earlier repairs involved using several pine boards to create interior runners for the drawer. these were superfluous, so I removed them and recycled them to make the new parts needed. Below is a photo of these two guides. the one in the back is original.
 Here are the original interior runners for the drawer. They were very worn, but by removing a little material and adding new material, I could salvage them. The first photo shows the original runners, the second shows the new material being installed, The third shows the runners after they were cut to shape. The forth shows one of the runners being installed in the case.


 Once the back had been removed, I found that the tops of the legs had been split open by the cut nails being driven into them. The effect was a wobbly desk so in the next few photos I show the damaged areas and the pieces being re-attached.


 Here is a photo of the case being worked on.
 On the top surface there was a huge piece missing. While some damage is nice to leave, I felt that this needed to be addressed, so I patched it using Walnut. Below is a photo of the patch being put in place.
 The drawer sides had gotten very worn and on one side, sections were missing above the drawer bottom. Luckily, I had some old poplar that I could recreate the drawer runners with. the first photo below shows the drawer sides.
 I removed the damaged areas and cut new wood to replace them. The photo below shows the new (old) wood laid out next to the drawer sides.
 After the sides were repaired I re-assembled the drawer.
 the drawer bottom was a little loose, so I installed glue blocks made from old pine to reinforce the drawer bottom.
 I also replaced missing blocks on the bottom of the little drawers.
 The hinges had been moved at some point, so I wanted to put them back in there original location. This meant repairing the old hinge mortises and patching the new ones. Below are two photos of the hinges at first.
 The next four photos show the walnut patches being glued in place on the desk and the lid. These were later carved down and touched-up to blend the patches in.


 The lid supports were also damaged. One was broken and new material needed to be added to get the proper length. One thing I found interesting is that the stops for the lid supports were cut nails. usually a cabinet maker would glue a block in to act as a stop, but I guess that it was easier to simply drive a few nails!
Here are the lid supports. the one on the bottom is the broken one.
 I patched the broken lid support using a lap joint to join the new wood. The photo below shows the two boards being glued together and second shows a close up of the lap joint.
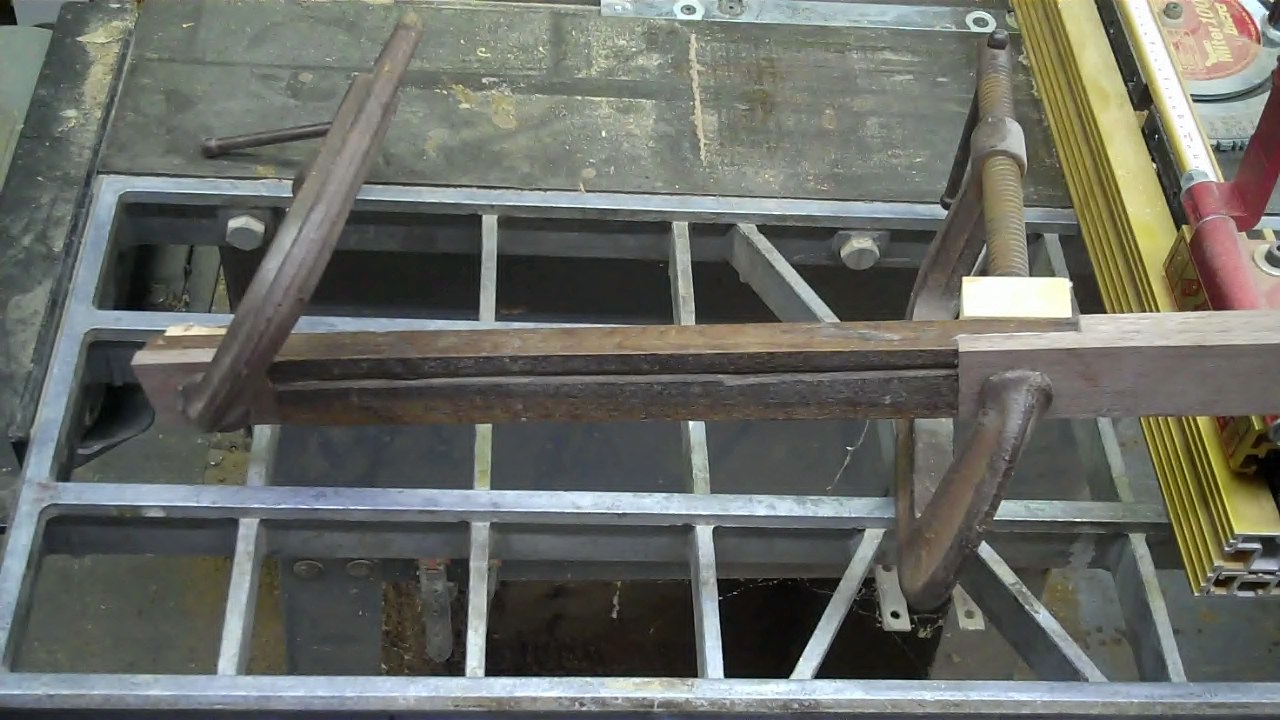
 After all of the repairs were made, I cleaned the finish gently and began to seal it wit shellac. this photo shows that piece after a thin coat of shellac.
 The last six photos show the desk restored, I replaced one escutcheon and the pulls for the lid supports, but the pulls for the inside drawers are original.


Wow…outstanding service and products to meet our office needs. I Love all and the colors you choose are perfect. I want this furniture for my new house. Thanks a lot for sharing
ReplyDeleteDressing Table In Chennai With Prices