.jpg)


:
The first step was to remove the old fabric .


 To properly glue a chair, the loose joinery must first be taken apart and cleaned of all of the old glue.


The Break in the leg
 Initial gluing of the break
 Pathes dry fit into place before trimming


 The packaging tape around the runners is to keep finish from gettting on the runner system.

 The first step in the process was to turn the blank into a cylinder. the blank was large enough to accomodate two turnings so I turned the whole blank so I would have a back up in the event of a mistake.
 Below is a photo of the blank turned to a rough cylinder.
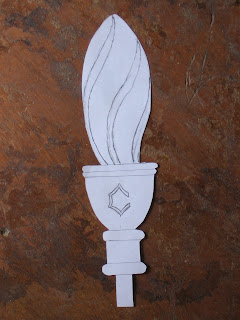
 After completing the urn section, I turned most of the flame part. the next step was to sand as much as possible before removing the blank section . The last step would be finishing the flame tip, sanding the rest of the piece and turning down the tenon at the bottom. This is saved for last because it is the thinnest part of the turning and because of it's location in the finial, the weakest.
  Below is a photo of the completed turning, sanded and ready for carving, The Finial will get finished later after the carving is completed.

 I have added four photos of the repair work done to the walnut chest. The first is regluing the joinery of one of the drawers. the second is gluing down loose veneer on part of the mirror stand. The third is four new interior runners set next to three worn runners (worn runners are to the right) and the fourth picture is of two parts of the mirror stand. the one on the right has been stained. The reason for this is that the chest is made from two woods, to reconcile this in the factory, the manufacturer adds stain into the finish and basically paints the entire piece. to reveal the natural color and beauty of the walnut veneer, I selectively stain the piece so that all parts match.


 The next step in the process is sanding. Because the table had so much water damage this meant startin g at 80 grit sanpaper and sanding through the grits on up to 320 ( 80,100,120,150,220,320!) All sanding was done by hand with a sanding block. I have included a photo of the apron with one half sanded and the other not, a photo of the legs after they have been sanded, and the sanded table reunited with its legs and it's three leaves!
.jpg)

 Here is a walnut dresser with mirror and an oak kitchen table that I am currently working on. The table came partially stripped but with water damage on the top. both pieces will be stripped of their old finish, sanded, selectively stained and french polished. The table will also get a new set of brass casters. I will post more photos as the work progresses.


.jpg)
