Welcome to my blog which follows my furniture restoration business. Please feel free to comment at the bottom of the post, and if you would like a response please leave your email address. you can also contact me directly at info@johnmarkpower.com. And by all means, if you like something please feel free to share it.

Thursday, July 29, 2010

The Design Center in Shepherdstown, WV

The Design Center, located on West German Street in historic Shepherdstown, West Virginia, is a local business focusing on interior design that I have been working with for a couple of years now. Owned and Operated by Sue Marks, The Design Center offers a wide range of services including in home consultation. One of the features I like about the business is their impressive selection of fabrics that are in store. If you are thinking of reupholstering a piece or redecorating a room, give Sue a call. I am sure she would be happy to help you out.

Here is the contact information and website for the Design Center:


The Design Center, LLC - Affordable Services/Reliable Resources
Sue Marks - Owner Designer
www.designshepherdstown.com
304-876-6555 (office)
304-876-6880 (Fax)

Located at: 122 West German Street, 2nd. Floor
Shepherdstown, WV 25443Mail-to address is: PO Box 3611, Shepherdstown,WV 25443Here is a sample of some of the design center's work. there is a much larger portfolio available on the website.
Here are a few projects I have worked with Sue on. The firs is a Dome Trunk that I restored for one of her clients.

Here are some chairs with fabric that Sue helped my customers pick out:

Tuesday, July 27, 2010

5 Year Wedding Anniversary Present (2010)

My wife and I are celebrating our 5 year wedding anniversary this Friday! I looked it up and found out online that this is the "Wood" anniversary. I thought to my self "PERFECT"!! I thought fora while and decided to try my hand at jewelry making. What came of this was a necklace made from Black Walnut and Box Elder, Two Appalachian hardwoods. Box Elder is a cousin to the Maple and often has beautiful red streaking in it. the piece I chose had some nice figure of tiger striping but very little red. Below is a step by step photo shoot of the fabrication of this necklace.

Her is what I started out with. The piece on the left is the Box Elder and the piece on the right is The Black Walnut. I drilled a 1 1/8" hole into the black walnut to insert a turned plug of the box elder.
Here is a photo of the Box Elder plug next to the Walnut. I burned the edges a little which created a nice black line between the two pieces of wood.
Next I glued the Box Elder into the Wanut with the Box Elder Skewed at an angle from the Walnut grain.
The blank all glued up. What I forgot to show was that the next step was to scribe an off center circle on the Walnut surrounding the Box Elder. I then cut out a turning blank based on this circle.
Here is the blank chucked up and ready for turning!
This photo shows the face of the necklace turned.
The next step was to apply some finish to the face of the necklace.
this photo shows some of the back side being turned.
Once I sanded the back side I parted it from the rest of the blank and finished sanding and coating it. I also drilled a small hole to receive the leather cord. Here is a look at the finished product with a blurry close up shot following!

Completed Mahogany Pembroke Table (ca. 1980)

Here are some photos of the Pembroke table I was working on completed. The first two photos show the table with the top up. the next two show it with the top down. The last is a close up of the top which shows the beauty of Mahogany!


Completed Singer Sewing Machine (1935)

Here are a few photos of the Sewing Machine I have been working on completed. for a look at the restoration process follow this link:

http://johnmarkpower.blogspot.com/2010/07/singer-sewing-machine-with-walnut-case.html

The first two photos show the case and the last three show the case with the sewing machine displayed.


Completed Tripod Tables (Ca.1830 and 1950)

Here are some photos of the two tripod tables I repaired. I applied paste wax to both tables to shine them up a bit.

Th 1950's Mahogany Pie Crust Table with the top repaired.
Two views of the completed Pie Crust Table.

Here is the 1830's Mahogany and Elm Tilt Top Game Table. The first two photos show the table with the top up and the last two show the table with the top down.


Wednesday, July 21, 2010

FOR SALE: Sheraton Style Walnut Side Table (ca. 1970)

The table pictured below is for sale. It is a reproduction Sheraton style Walnut side table with one long drawer. I put it's date of manufacture at 1970, but it could be a little older than that. While not an antique, this is a nice table. The primary wood used for the table is Black Walnut and sections, notably the drawer front, are figured. The legs and Knobs are also turned from black walnut. Overall the table is in fine shape. It is a piece that is "ready to go", but of course the finish could be improved if desired.

Most likely, this table was made by an individual in Loudoun County, Virginia. this would make an excellent side,entry, or sofa table. You can click on the images to view them in larger dimensions. I have listed the sale price below as well as an estimated restoration cost. If you are interested in purchasing this table please contact me at (703) 727-5691 0r at info@johnmarkpower.com.

AS-IS Price: $375.00
Restoration Estimate (if desired): $475.00 (Refinishing), $125.00 (Clean and Wax)


Biggs Mahogany Pembroke Reproduction Table (ca. 1980)

One of the many projects i am currently working on is a Mahogany Pembroke table made by the Biggs Furniture Company of Richmond, Va. I put a date of 1980 on the table but the table could easily be twenty or thirty years older. Although Biggs has gone out of business, they were once one of the premiere colonial reproduction furniture companies in Virginia. Here is a link to a Wikipedia entry on the company:

http://en.wikipedia.org/wiki/Biggs_Furniture


the table was in fine shape overall and is made of nice Honduran Mahogany. The only real issue with the table was the finish. Unfortunately, I forgot to take a "before" photo of the table. I did take some photos of the refinishing process. The first shows the table with the old finish removed and all of the surfaces sanded.
This next photo shows the table after it has been stained. The dark color will look lighter as the finish is applied.
Once the stain had dried, it was time to start French Polishing. This photo is about half way through the finishing process.
I will post some completed photo shots when I get the table done.

Sunday, July 18, 2010

Two Tripod Tables (ca. 1830 and 1950)

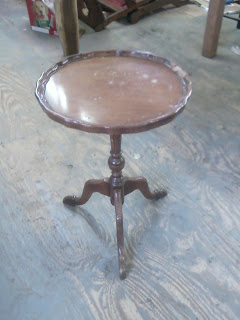
A customer brought me two tripod Mahogany tables which needed some repair. the first was a small candle stand with a pie crust edge made in England around 1950. It had some damage to the pie crust molding which needed to be patched. Below are some photos of this process:

The table as it came to me.
This photo details the damage to the molding.
The first step was to carve the missing area down to receive a patch.
I used a Mahogany board to match the grain orientation. the patch was then drawn out and cut out on a band saw.
This photo shows the patch being glued in place.
After the glue had dried the patch was ready for carving.
Here is a photo of the patch after it had been carved to match the existing molding.
the last step was to touch up the patch to match the color of the existing finish. Here is a photo of the top repaired!
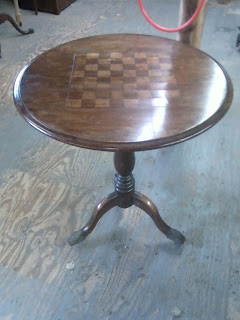
The second table was a game table/tilt top from around 1830. It was manufactured in England. I believe that this table was married and that the top came from another table. In addition, I think that the top was burned (there is evidence of this on the underside) and that to patch the burn the center was cut out and the chess board was inserted. In any case, it is a unique table with nice lines. On its way across the pond it developed a crack in the top due to changes in environment. this crack had actually been repaired with a wedge before, but what was really needed was a Butterfly patch. the photos below show this process.

The table as it came to me.
The crack in the top
Gluing the butterfly patch in the underside of the top. the patch is shaped this way to help prevent the crack from opening up again.
This photo shows the top being french polished after the repairs were made and the crack was touched up.
the photo below shows the butterfly patch on the underside of the top after it had been sanded and stained to blend in to the finish.