Welcome to my blog which follows my furniture restoration business. Please feel free to comment at the bottom of the post, and if you would like a response please leave your email address. you can also contact me directly at info@johnmarkpower.com. And by all means, if you like something please feel free to share it.

Tuesday, March 25, 2014

Georgian Mahogany Grandfather clock (ca. 1750)

The Completed Clock
  A recent project was the restoration of an English grandfather or longcase clock made in London ca. 1750. The case shows Rococo influence which was popular in England during the middle period of the 18th century. This particular clock case houses works by Thomas Dale of London. Below is a photo of the brass dial with silvered chapter ring and name plate followed by a close up of the name plate.

The works appear to be eight day time and strike and include a hand that recorded the passing of seconds in addition to the minute and hour hand. Below is a photo of the works.
The case itself was built from English oak veneered with fine West Indies mahogany. The mahogany was inlaid with banding made from several woods and the back of the case was made from elm. Pine was also used throughout as a secondary wood.

While I could not find working dates of Mr. Dale, the case design itself seems to be associated with the clockmakers of London, as the name plate demonstrates. In researching this clock, I found several examples of this case design an all of the examples I saw were associated with London clockmakers.

The design specifics mentioned above are mainly seen in the bonnet and the waist door. These London examples had what is refered to as a Pagoda top, with a brass sounding fret centered above the clock face. The sounding fret exhibits the strongest influence of Rococo on the entire clock and I will discuss this further later in the post.

Another  design element common to the London cases was the fluted columns flanking the clock face with stopped reeding made from brass wire. Below the bonnet, The applied molding on the waist door was common to these cases and was additionally seen in some cases on the base of the clock. In this case inlayed stringing was favored over applied molding on the base.

While none of these design element should be seen as being exclusive to London clock case manufacture, the combination of all of these design elements seems to point towards a popular style of longcase made in London during the mid 18th century. The date I ascribed to the case is a guess and the case could have easily been made earlier or later than 1750. If I had to choose, the use of Oak for the case construction would point towards an earlier date as pine was used later in the 18th century. 1750 seems to be a good compromise.

The case was very damaged when it came to the shop and beyond loose veneer, it required the repair of the decorative molding around the waist door and countless other patches and wedges. In addition, the base had separated from the waist and was only loosely attached by nails driven through the veneer. the repairs and restoration of the original finish are detailed below. I have separated the repairs into three sections to keep every thing straight.

The Base

The base of the clock had broken feet, cracks in the veneer, a warped front, and several other smaller repairs that needed to be made. In addition, the back of the base which was made of pine and separate from the waist back, had broken along an old glue line. Below are a few photos of the base once removed for the waist.


As you can see, the base's front and sides were cracked. In addition, the front board beneath the crotch mahogany veneer was warped and needed to be secured from behind. The following photos show the repairs to this section of the clock case.

these first two photos show the secondary wood beneath the mahogany feet, which were cracked. The pine board that supported the mahogany foot had rotted where it contacted the mahogany. I pared this rot away with a chisel  until I got to clean wood and then cut a patch using reclaimed pine to fill the gap, which can be seen in the following photo. After this ground was built back up, the mahogany foot was reattched.

This photo shows the case being glued including the loose back as well as the feet being glued in place.

After the case was stabilized, glue blocks were added to the interior side of the front to bring the face of the front flush and then a wedge was added to fill the crack in the front face.
This photo shows the wedges around one of the sides as well as the cavetto molding that transitions to the waist section being glued.
 This last photo shows the replacement of a glue block on the back right foot.
 
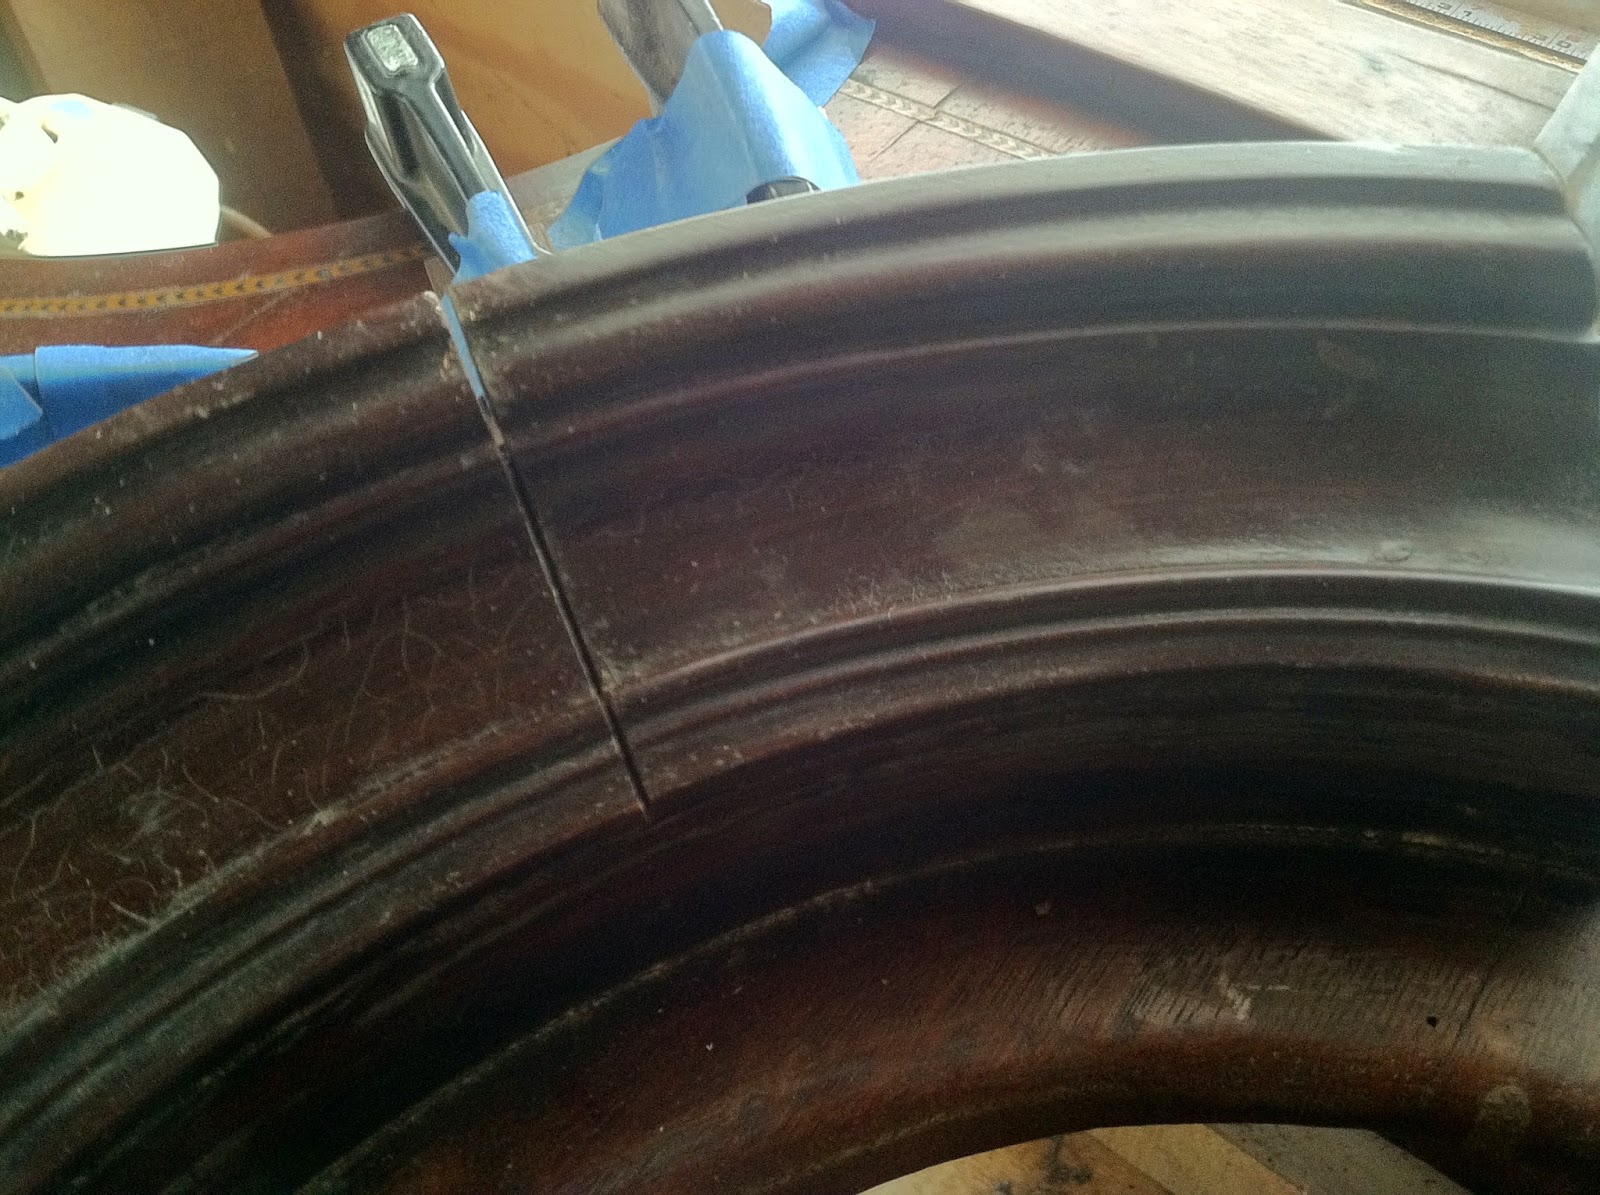
The Waist and Waist Door

The waist section of the clock had loose and missing veneer as well as some structural issues that needed to be addressed. The photo below shows the bottom of the waist section that fits into the bottom of the case exposed. The nails from a previous restoration were removed and the old glue was cleaned so that the two sections could be glued together again.
This photo shows the waist resting on its front and some structural repairs being made to the back and side.
The waist door was a typical tombstone shape with applied molding around the edges and inset stringing to complement the base and bonnet. The door was made from quarter sawn oak and veneered with West Indies crotch mahogany. The applied molding was then applied around the edges onto the veneer. Over time the door had warped a bit making the veneer loosen in many places. In addition, the thin molding which overhung the edges of the door had snapped and cracked in many places.

Several gluing sessions took place to glue all of the veneer down in the central part of the door. The photo below shows this as well as the curved molding being reapplied on the top of the case.
This photo shows a second, less extensive gluing session.
As stated above, the molding was cracked and broken throughout. A long section was very broken on one side with small portions missing. The same was true with the bottom section of the molding. Rather than scrapping this and making new molding, I felt that with a little work this original molding could be salvaged. Below is a photo of the damaged molding.
The first step was to remove the damaged molding and clean the old glue. Then I scored the veneer that rested below it and removed it from the door. This left the oak substrate exposed in this section. I was careful only to remove the veneer that lay under the molding and would otherwise be unseen. The photos below show these cleaned sections. Apiece of mahogany veneer rests on the door that was later used in the repair.

These fragments in the photo below are the bottom section of molding snapped into three pieces.
In the place of the veneer that I removed, I cut new veneer that I would apply to the back of the repaired molding. Instead of having the veneer lay with the direction of the grain the same as the molding, I cut it so that it would run perpendicular. This gave a bridging reinforcement to the molding much in the same way that plywood works. The sections of veneer are laid next to a piece of molding in the photo below (and yes, that is a paper cutter I used to cut the veneer that the pieces are laying on!)
This close up shows how the veneer was laid with the grain running perpendicular to the grain of the molding adding strength to the molding.
The next photo shows the long section ready to be attached to the door and then being attached to the door with the help of many small clamps. Once the glue dried this proved to be a strong repair and the molding was level with the other molding since I had removed the old venner prior to attaching the new.


The Bonnet

The bonnet had many loose areas and the top boards were completely removed and glued back in place. They were also lined on the interior with canvas to give strength to the thin boards. The photo below shows many sections being repaired. Since the glue takes a while to dry, it is important to do as much in one gluing session as possible.
A close up of the same repairs.
Another repair.
A crack in the molding that surrounds the bonnet door was stabilized with a wedge inserted with glue and then carved flush. This first photo shows the crack followed by another photo showing the wedge.

The bonnet sides were composed of four boards to allow for sidelights (allowing the works to be viewed from the side of the bonnet). These boards were veneered over with mahogany. Over the years the board shrunk and cracks developed where  the boards were joined. These were filled with wedges as seen below.
The last part of this section refers to the sounding fret. The sounding fret is a piece of pierced brass that sits above the face of the clock and allows the bell to be heard unobstructed. This particular sounding fret was cast from brass. Some can be seen cut from wood and lined on the back with silk. As I sat to write about this I opened up John Bly's Antiques Masterclass published by Millers and found a statement that described this piece and its decorative function on the clock. "The widespread appeal of the Rococo style stemmed from the fact that just one small element of it could be applied to the plainest item and thus lift it into fashionable status- a "C" scroll on a plain table, an acanthus leaf on the handle of a simple jug, or a raffle scroll on a clock face can gladden the heart of a collector scouring a boot sale today." (1)

While this clock is certainly not "the plainest item", the idea that one piece of decoration can give definition to the overall style of a piece can be seen here in full force. The cast sounding fret shows a plentiful array of scrolls and architectural elements that have a sort of asymmetrical symmetry that defined the rococo style. The break from the earlier baroque ideas of symmetry and order are clearly demonstrated and a statement of nature and its own balance that was so much admired by the artists and craftsmen of the 18th century is visible in this single piece of hardware. Nowhere else on the clock case is such sophisticated and detailed decoration seen. Likewise, the sounding fret has the effect of tying in the case to the face of the clock, which should rightfully be the focus of the entire piece. Below is a photo the sounding fret before cleaning followed by another photo of the cleaned hardware. 


The Completed Clock

These last few photos show the completed clock after the finish was restored. The original finials were missing when I received the clock so new ones were furnished by Londonderry Brasses (http://www.londonderry-brasses.com/). They were actually hand delivered with several others by the owner of the company who was passing through, and we fit different finials to the case until we found the right ones. Thanks Nancy!

The restored case
The restored base section.
A closeup of the bonnet showing the sounding fret and the finials.

These last few photos show the clock at home with the works installed.


(1) Millers John Bly's Antiques Masterclass Copyright Octopus Publishing Group Ltd. 2005

Tuesday, March 4, 2014

Federal Bachelor's Chest (ca. 1810)

The Completed Chest
Recently it has become harder to find the time to write, and as a result I have accumulated a surplus of pieces to write about. One of these pieces was a chest I worked on about a month ago. For lack of a better term, I will call it a bachelor's chest. A bachelor's chest is a primarily English form of chest of drawers that was scaled down in size for easy transport. Besides the smaller size of these chest, other characteristics were lifting handles fixed to the sides and either a top that folded out using Knife hinges (much like a game table) which would double as a writing surface or brushing surface, or an actual brushing slide that would pull out just above the top drawer. All of that being said, not all examples had all of these features and in modern times bachelor's chest has become a catch all term for diminutive chests.

As stated above, this was primarily an English form, but American examples do exist that would fit all of the criteria for a bachelor's chest. The chest I worked on exhibited some of the characteristics of a bachelor's chest and was called a bachelor's chest in the auction listing that it was sold under. Here is a link to that listing:

   http://alexcooper.hibid.com/lot/68009-36748-6282/federal-mahogany-bachelors-chest#.UnObihWHhEI.email

One thing that is for certain is that this is an American chest that was probably made in Upper Massachusetts or New Hampshire in the early part of the 19th century. The chest is made primarily of Mahogany and the drawer fronts are veneered with bookmatched panels of figured satinwood. The bookmatched veneer is framed with banding of alternating light and ebonised woods, probably holly. The top edge and skirt are banded with vertically oriented rosewood framed with holly.

 The sides had an incomplete set of lifting handles which appeared to be original and the brass pulls, while looking quite authentic, were replaced at some point. As seen in some pieces, all of the drawers had inlaid brass escutcheons but only the top two drawers were equipped with locks. The locks appeared to be original to the piece.

Below is a photo of the chest as it was when it came to the shop.
The top surface showed some significant water damage to the finish as well as bleaching form UV light.
The sides, besides being very dirty, were cracked.  Also in this photo is one of the mounting plates for a lifting handle. The other plate and the handle were missing from this side.
On the back side of the chest were remnants of a moving label from Marblehead, Massachusetts, a sea town north east of Boston. Judging by similar dated moving labels, I would date this label to be from late 19th / early 20th century.
One curiosity about this chest was that it appears to have been altered at some point. Below the top on the inside of the chest was evidence of old glue blocks which had failed. The "shadow" of these blocks is visible in the photo below. What was curious about these shadows were that they were located about one and half inches below the inner surface of the top. In addition, there was a consistent line that was visible about halfway between the inner surface and the bottom edge of the shadow. It appeared to be an outline of another surface that the blocks were attached to that was below the original top. This can vaguely be seen in the photo below.
On the sides the top was attached to the case by use of battens running from front to back which were screwed to the top and sides. These battens, seen below, are modern replacements.
Another interesting feature was the remnants of hinge mortises on the upper edge of the back panel and the lower edge of the back side of the top. These mortises suggested that the top was once hinged to the back and the shadows of the glue blocks mentioned above seemed to point towards an inner surface that was revealed when the top was lifted. Every board that I examined appeared to be original to the piece and the only really confusing part was that the hinge mortise on the top surface were a different size then those on the bottom surface. This would indicate two separate sets of hinges. The mortises can be seen below.
It is quite possible that this piece originally had a lifting top, but the evidence is inconclusive. It seems that all of the pieces were original and that no piece was re-purposed from another older piece of furniture. Perhaps another example will surface in the future that will shed some light on this.

The skirt of the chest was made of mahogany with an inlayed band of vertically oriented rosewood that was framed by holly. The skirt was not integral to the sides, but was applied with the grain running vertically, like the sides. Over time the skirt had broken into sections and had loosened up. Past repair showed that it was nailed back in place, which in the long term was not very effective. As a result, much of the skirt was loose and a large portion was missing and had to be recreated. Below is a photo of a section of the skirting followed by a close up of the banding.

These next photos show the underside of the case. A section of the loose skirting is seen laid on its side on the bottom of the piece.


To recreate the missing portion of the skirting I needed to make some of the rosewood banding. Many years ago I went to the recycling center in Lovettsville, Virginia to dispose of my cans and bottles. when I got there I saw a wooden frame leaning up against the metal recycling containers. The entire frame was made from solid rosewood. I brought the frame home and over the years I have used this wood for various patches on furniture. I used a small section to make the inlayed banding for this chest. The board used can be seen below.
I first cut four section of the rosewood with the grain running up and down, as seen in the photo below.

The next step was to glue these together to make a long strip, as seen in the next photo.
Once the glue had dried, holly veneer was glued onto the outside edges of the rosewood strip.
Once all of the glue had dried, I cut thin strips of banding on the table saw from the blank I had made. The finished product is seen below.
When making the missing portion of the mahogany skirting, I noticed that the inside face of the skirting was not perpendicular to the bottom, but raked at about a 5 degree angle. What purpose this served is beyond me, but being faithful to the original maker, I cut my skirt with the same profile. This can be seen in the photo below. You are looking at the edge of the skirting.
The same mahogany blank seen above is seen here with the face used for the outside edge facing the camera.
Using a rabbit plane, I created a groove along the edge of the blank for the banding to seat in.
The next two photos show the groove without and then with the banding in place.

This photo shows the new apron bank next to an old piece of the skirt.
Once the banding was glued in place, I fit the blank into the space for the missing skirting as seen below.
I next traced the profile for the skirt from the other side and cut away the excess so the blank fit the profile of the missing skirt.
These next few photos show the skirt and the new section of the skirt being glued in place.


Test fitting a bit of the banding to an area where a tiny bit was missing.
More gluing of the feet and the skirting.
This photo shows the new drawer stops being glued in place. The next photo shows the drawers fit in place. Notice how the shadow of the drawer pulls are lighter where the pulls covered the wood. This is because satinwood oxidizes darker when exposed to sunlight, while woods like Mahogany will lighten when exposed to the sun.

The finished chest with a restored finish and cleaned hardware.


The new lifting pulls were supplied by Londonderry brasses in Pennsylvania. They fit great!
A final photo showing the beautiful grain on the drawer fronts.