Welcome to my blog which follows my furniture restoration business. Please feel free to comment at the bottom of the post, and if you would like a response please leave your email address. you can also contact me directly at info@johnmarkpower.com. And by all means, if you like something please feel free to share it.
Showing posts with label Chairs. Show all posts

Tuesday, September 8, 2015

Some Recently Completed Pieces

19th Century English Cherry Dressing Table
I have developed a bit of a backlog of photos of completed work over the past couple of months. In an effort to catch up I am showcasing some of the more interesting pieces that have come through the shop recently. Below I will describe the pieces and the work we did to them.

1. English Lath Back Windsor Chair
 This was one of my favorite chairs to ever come through the shop. It is a Lath Back Windsor made from various woods including beech and elm. It was made sometime in the middle of the 19th century. 

These chairs are great, they have great form and are very comfortable. This one had loosened up so I glued the loose joinery. The wear on the chair was wonderful, especially on the arms, so we simply cleaned and waxed the finish.

2. Four Ladderback Chairs
 
These chairs are pretty run of the mill, and were probably made around 50 years ago. I chose these to showcase the great job my caner did on the rush seats! Beyond the seats, I glued the loose joinery, and cleaned and waxed the finish.

3. Parquet Table with Draw Leaves
I have written about draw leaf table before on this blog. All of the examples that come through the shop seem to be from the early part of the 20th century. This one was made form European walnut and beech. It had a French country style, and was probably made in France or possibly another country on the European continent. This table was in pretty rough shape, so we removed the finish and refinished it with a French Polish finish.


 4. Walnut Breadboard End Table 
This table came from Switzerland and was made from old boards of European walnut. That being said, it was made fairly recently. I liked this table a lot because it reminded me of the first dining table I made, which was also of walnut. The finish was in bad shape, so we refinished this with a French Polish finish.


 5. English Cherry Dressing Table
This was a sweet little table, made from European cherry in the early part of the 19th century. Despite the cabinetmakers attempts to use good straight grained wood, the back legs had warped severely! Because it was stable and there is no real way to fix this, I left them as is. This piece was refinished with a French Polish finish.


6. Walnut Drop Leaf Table
This table had some beautiful walnut veneer, as seen in the photo below. It was made in the 1930s and I refinished it with a French Polish and found a new walnut knob for the drawer.


7. Reproduction John Shaw Four Drawer Chest
This chest was a lovely reproduction of  a chest made by John Shaw (1745- 1829), a cabinet maker from Annapolis, Maryland. The reproduction was made by Biggs Furniture of Richmond, Virginia. The chest, like the original, had beautiful crotch mahogany on the drawer fronts. Quite a lovely piece, reproduction or not!

8. Mahogany Display Stand
 
This stand had a lot of work put into it. The top was edged with inlayed banding, some of which was missing and we had to recreate. We also glued the loose joinery, replaced some of the glass, covered the bottom with felt, and refinished the entire case.


I am sure I have more photos like these so I will probably be putting together another post soon of pieces that were recently restored.

Monday, September 7, 2015

Painted Chairs (ca 1990)

The Completed Chairs
One of the things we have started doing this year on occasion is to paint furniture for customers. We were hired earlier this year to paint a set of eight chairs and reupholster them as well. The chairs were around 25 years old and the customer loved them, but wanted a color change. Below is a photo of two of the eight (originally they were painted  yellow, red, and eggplant). The rest of the photos show the painted chairs with the new upholstery.


Saturday, February 7, 2015

X- Frame, or Campeche Chair (ca.1820)


The completed Chair
Strictly speaking, this is not a Campeche chair. The Campeche chair is a type of chair popular in the plantations of the south and was made in Mexico and in the southern United States in the 18th and early 19th century. The name comes from Campeche, Mexico, a state bordering Yucatan in southeast Mexico. The form is believed to have originated there.

While these chairs were being made there, Europe saw the emergence of what the English refer to as a X-Frame Chair. This name comes from the X shaped base of the chair that can be seen from the side. The X-frame design is a twist on The Curule chair, an form first seen in Ancient Rome and later to reemerge as part of the neoclassical period of European furniture history. In the Curule chair, the X-Frame that makes its design is seen from the front of the chair.

The design for the X-Frame chair is so similar to it's Central American cousin, that all of these chairs are commonly referred to as Campeche chairs. What ever you want to call it, this chair is very rare and of all of the examples I looked at in researching this post, it is the finest.

The primary wood used in the frame is West Indies mahogany (see my last post) and the entire frame is inlayed with sand-shaded satinwood. The curvilinear design is very much in keeping with the neoclassical ascetic (for comparison, see my last post) and the workmanship throughout was outstanding.

The joinery on one of the legs as well as one of the arms had loosened and I cleaned and glued the joinery in my shop. Other then that, I cleaned and waxed the existing finish on the chair. Because of the work done on the chair, I chose not to photograph the repairs, but chose to focus instead on the completed photos. This is quite a rare chair and I wonder if I will ever see another like it come through my shop!


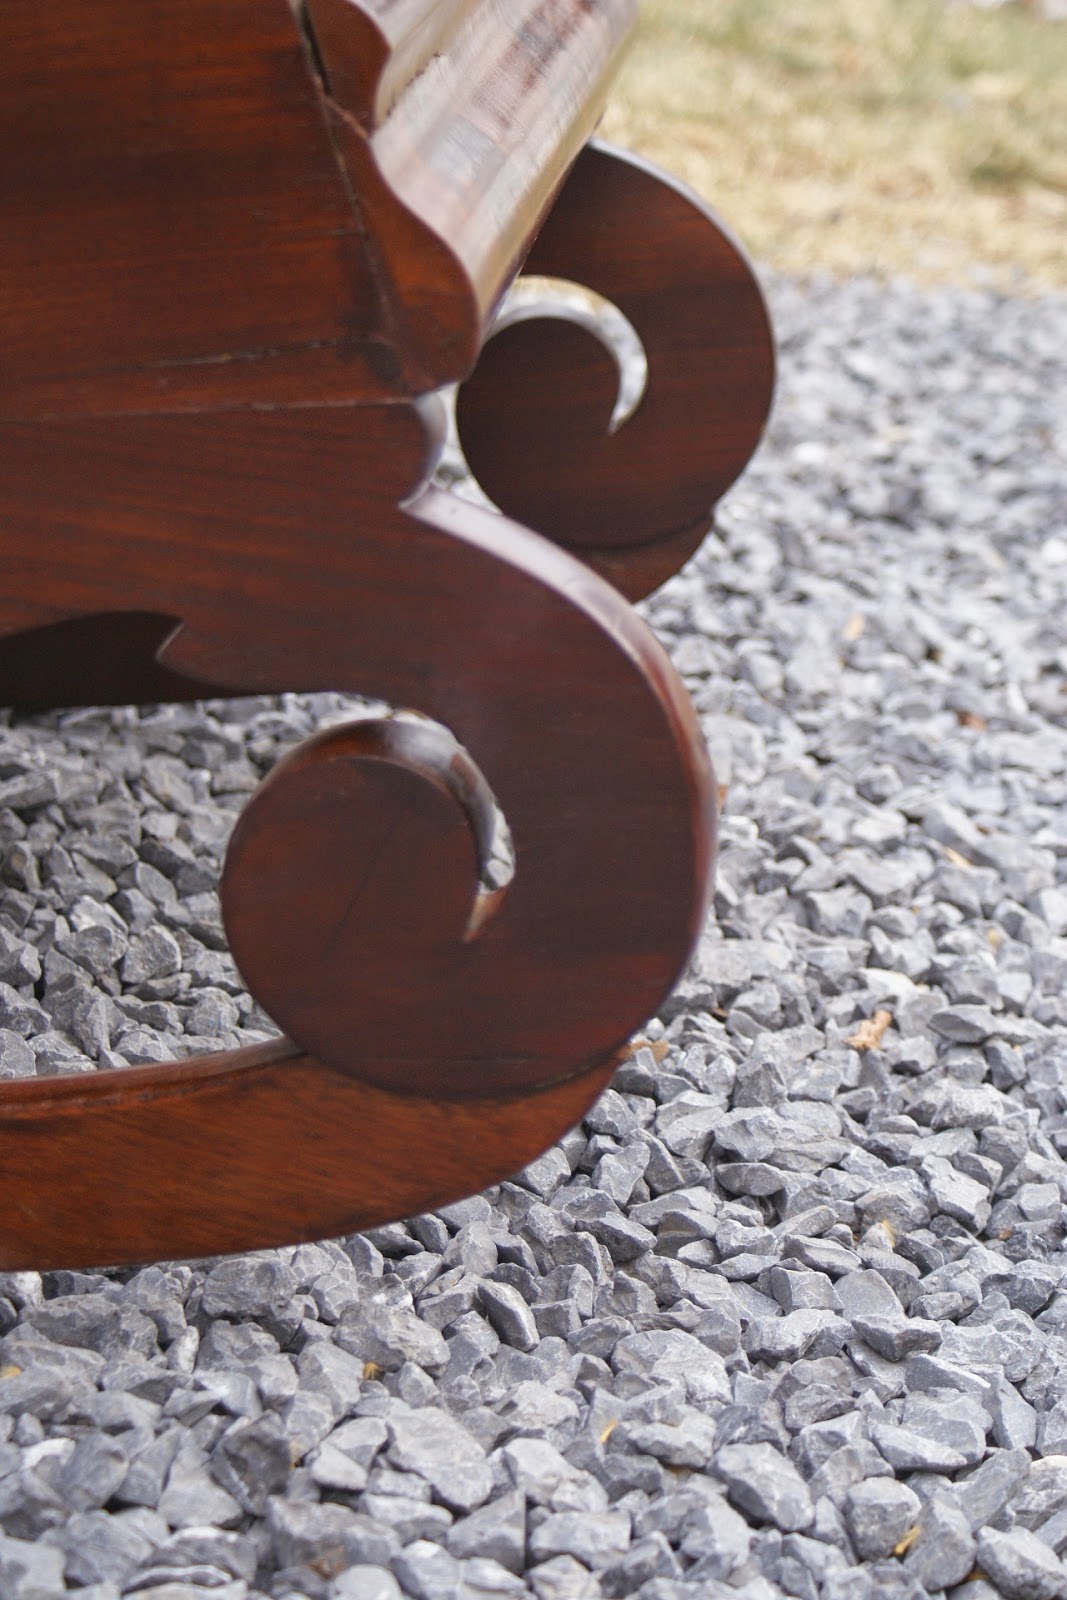
Late Classical Mahogany Rocker (ca.1840)

The Completed Rocker
What is good mahogany? What do people mean when they say "This is good mahogany, or that piece has fine mahogany in it"?

The answer  to these questions could fill up a book, in fact it did. Mahogany: The Costs of Luxury in Early America by Jennifer L. Anderson traces the United States love of this wood through the 18th century and well into the 19th. It is a comprehensive look at how we used and abused this wood to the point where it is in some cases in a state of commercial extinction. If you have any interest in the subject, I highly recommend this book.

In and attempt to answer the question a little more quickly, The two main types of mahogany used in the production of fine furniture are Honduran Mahogany (swietenia macrophylla) and West Indies Mahogany (swietenia mahogani) Both are fine woods and can be polished to a nice shine, but latter is what people refer to as good mahogany.
Swietenia Mahogani is found throughout the Caribbean region and when originally harvested, differences in the micro climates where the timbers grew gave the wood different characteristics, giving rise to many different names, including Haitian mahogany, Cuban mahogany, Santo Domingo mahogany, Jamaican mahogany etc. While all of these woods had different characteristics they were all swietenia mahogani. Distinguishing what wood came from where these days is difficult so the name of West Indies mahogany has been adopted when referring to swietenia mahogani.

 Swietenia macrophylla, or Honduran Mahogany is found in a much larger geographical area including much of Central America. The trees are bigger and produce quality lumber that is still being produced today. 

In the 18th and 19th century, it was common for cabinetmakers to use both woods in a single piece of furniture, usually reserving the West Indies mahogany for the showier places like drawer fronts, while the sides of a case for a chest of drawers might be made of Honduran Mahogany. Each piece of furniture was different, but when it was available, West Indies mahogany was generally preferred.

Today, Honduran Mahogany is the only true mahogany commercially available. The only West Indies mahogany available is old stock or pieces reclaimed from furniture and architectural pieces. When possible, I use reclaimed West Indies mahogany to make repairs, but when the repairs are substantial, I use Honduran and apply stain and touch up to blend the repairs into the existing wood.

In the case of the rocking chair, the majority of the chair was made from exquisite West Indies mahogany. One of the rockers was broken and in need of repair, involving the use of bridging patches to span a very broken component. 

In order to make room for the patch, I need to remove some of the wood around the broken area. I used a router to do this. Even though it is a small amount of wood, I always lament the fact that I am pulverizing a wood that is no longer available. I try to keep these repairs to a minimum and only do what is necessary.

When I routed the wood, I was left with a pile of shavings of West Indies mahogany. Below is a photo of those shavings next to a piece of Honduran mahogany used for patching.

The first thing to notice is the color difference, The West Indies mahogany being a rich dark color, while the natural Honduran mahogany is much lighter. If the shavings were one piece of wood, you would also see that the grain is much, much tighter and the wood resembles cherry more than Honduran mahogany in some cases. The result is a wood with unbelievable natural color and and compact grain which lends itself to a high polish.

Below is a photo of the completed repair I spoke of above. You can clearly see the color difference here.
As far as the rocker is concerned, Once the repairs were made I cleaned the existing finish and polished it with Dewaxed Shellac. It did not take many coats to bring the finish to a high polish. All of the repairs were touched up and the chair was eventually waxed. The result of the restoration showed off the beauty of this wood. No stain was used on the rocker originally  and the only staining I did was to blend in the areas I touched up, as seen in the photo below of the same repaired area.

Below are a few photos of the the restored finish. The embroidered upholstery was old but not original. This piece is a stunning example of  a late classical rocker made probably in a city center like New York or Philadelphia. To me, the most stunning aspect was the fine mahogany used to execute the design of this chair. A most remarkable wood the likes of which we will never see again!


Monday, June 16, 2014

Two Empire Chairs (ca.1800)

The Completed Chairs

 Recently I worked on two chairs made in France circa 1800. It is a little difficult to firmly put these chairs in one stylistic category, although I conservatively lean towards the French Empire Period which lasted roughly from 1804-1814, I have good reason to think that at least the arm chair was made prior to 1800 which strictly speaking would put that chair in the Directoire-Consulate period (1795-1799) that bridged the gap between the Louis XVI period and the Empire period. Both chairs are made primarily of Mahogany with Beech used as a secondary wood. The chairs  are also decorated with Bronze Mounts that were once coated with a gold and mercury amalgam called Ormolu, in which the mixture is applied to the cast bronze and then heated, removing the mercury and leaving a thin layer of gold applied to the bronze. Over time this layer has been removed by cleaning, but evidence of the original gold was visible in many places.

the arm chair in particular was very broken and the customer and I decided the best course of action was to remove the upholstery so that I could access the broken areas better and make better repairs. Ultimately this meant removing the back from the chair and dismantling it. Below is a photo of the chair as it came into the shop followed by some photos of the damage to the back legs of the chair.


Upon removing the upholstery from the chair, I found a signature on the rear seat stretcher. the signature was written in India ink and appears to say "Filjame" followed by a date of either 1798 or 1793. This date was very hard to read and the more I looked at it the more I felt like it could say something else! Below are some photos of the signature.


I spoke with the Metropolitan Museum of Art in New York City concerning the signature. The museum houses a large collection of Continental furniture and so I figured they might know of this maker. The had not heard of him, but suggested that this could also be the signature of an upholsterer. My feeling about it is that it is the signature of the cabinetmaker due to the interior prominence of the signature. This signature is well executed and centered on the interior of the rear seat stretcher. It was meant to be seen ( once the upholstery was removed) and it almost seems to exude pride in workmanship. Although this is all speculative, it is my feeling on the matter.

As far as the date is concerned, being signed in the 18th century would make the chair older than the Empire period by a few years. All of these styles evolved and several design motifs spanned periods, especially when they were short lived. The tendency we have to place a piece of furniture in a specific period is relatively modern, and to the maker and the original owner, it would have been a chair made in the latest fashion. Either way , it is a well made chair that employs beautiful West Indies mahogany and great design.

Once the chair was dismantled, the first step in repairing it was to glue all of the broken pieces in place. These were all centered around the joinery in the back of the chair, in one case where tenons for a seat stretchers meet the rear leg and in another, where the crest rail is joined to the rear leg. In either case, these areas were weakened by removal of wood to create mortises and further weakened with the introduction of pegs, used to secure the joints. At first, these joints were sound and the loss of wood was countered by tenons glued in place. After 200+ years, the glue failed and the wood became brittle, leading to the structural failure. Below are a few photos of the broken pieces being glued in place on the right rear post (The direction is given as if you were facing the chair).


The left rear leg, seen below was in much worse shape.

Here is the left rear leg after it was glued back together.
One problem in this leg was that when the joinery was pegged, the holes from the pegs broke the internal shoulder of the mortise, making this shoulder structurally pointless. I decided to rectify this by removing a bit of wood and putting a patch that would be solid and bridge the lower and upper parts of the leg. Again, the location of this mortise is at the seat stretcher/leg intersection.

To create this patch, I employed a new method for me. It involves creating a negative space for the patch with a stacked dado blade (picture a bunch of round table saw blades sandwiched together in the table saw). I first clamped the leg to the table saw fence and secured it in position, and then raised the blade into the stationary leg. This can be seen below.

Leg clamped to the fence, the blade is lowered into the table.
Detail of the photo above.
While the blade was running, I slowly raised it into the wood, removing the damaged material and creating a negative space in the diameter of the blade.
Below is a photo of the leg with the arced negative space cut by the dado blade.
A similar procedure was done on  the other leg, where the crest rail met the right leg.
A close up of the damaged area.
The damaged area being removed by the dado stack.
Once the negative spaces were made. I milled a piece of mahogany to the exact thickness of the space cut by the dado stack. I then used a compass to trace an arc at the same diameter of the dado blade. I then cut the arc out on the band saw, giving me a patch that fit perfectly into the negative space made by the dado blades. Below is a photo of me scribing the arc. I clamped a piece of poplar to the mahogany to give a center point of the compass and then drew the arc.
Clamping the patch on the rear right leg.
The patch on the rear right leg once it was pared flush with a chisel.

The patch at the seat level on the rear left leg before and after it was pared flush.

Drilling out the patch on the rear right leg to create a mortise that would accept the crest rail tenon.
The completed mortise.
I learned of this method of patching by discovering it's use in a chair I was reparing. While not handwork, I like this patch because it is an effective method of repair and can be concealed within the workpiece a lot easier then a hand cut patch. I have used it in several scenarios and have found that it works great every time.

The side chair was in far better shape structurally and really all that it needed was to have the finish cleaned and the upholstery changed to match the armchair. Here is a photo of the side chair as it came to the shop.
A close up of the ormolu mount on the splat. Neoclassical themes abound!
To clean the Ormolu, I decided to use alcohol on a soft rag in opposition to an abrasive like fine steel wool. This would preserve any gold left on the bronze. Below is a photo of the same hardware cleaned.


Here is a photo of the side chair with the finish restored ready to go to the upholsterer. Because I did not need to fix any structural problems on the chair, I left the upholstery on and the upholsterer removed it.
This photo shows the arm chair restored and ready to be upholstered.

These final photos are of the chairs once they returned from the upholster.