Welcome to my blog which follows my furniture restoration business. Please feel free to comment at the bottom of the post, and if you would like a response please leave your email address. you can also contact me directly at info@johnmarkpower.com. And by all means, if you like something please feel free to share it.

Tuesday, August 24, 2010

Federal Walnut Chest of Drawers (Ca. 1800) Part 3

Below are some photos of the Walnut Federal Chest of Drawers I have been working on completed. Before these I put in a few close up shots of the pulls before and after.

This first photo shows the beautiful back plate with a rose motif. I believe that these are original to the chest. The one on the left is polished while the one on the right is not. I try not to use any products when cleaning brass , but just rely on fine steel wool and "Elbow Grease". Likewise, I don't coat the brass with lacquer or anything else so that it can tarnish again naturally. The shine doesn't last forever this way, But it sure is brilliant when freshly cleaned!
The Pulls before (Back Plates, Bails, and Posts)
And After.
From here on is a collection of photos of the chest completed. Some are taken inside and some out. I even got a friend to take a picture of me with the chest at the end. This was a wonderful example of early American Craftsmanship and was a joy to restore.


Wednesday, August 11, 2010

Federal Walnut Chest of Drawers (Ca. 1800) Part 2

I have been working on a American Walnut chest of drawers from around 1800. This is the second post concerning its repair. For a look at the repair of the top follow this link:

http://johnmarkpower.blogspot.com/2010/08/federal-walnut-chest-of-drawers-ca-1800.html


This post details all of the other work that went into the repair of this chest. I will post some completed photos of the chest next week.

The first two photos show some loose inlay at the bottom of the case being glued. It was loose and in some cases missing on both sides. The first photo shows the loose inlay and the second the inlay being glued.

The chest was also missing a glue block on the right rear foot. I was able to use an old board to make a new glue block. The first photo shows the glue block and the second shows it being glued.

After the trim was glued down at the bottom of the case I replaced a missing section. The blurry photo below shows this new trim in place. I left it long until the glue dried and then I removed the excess.
The next two photos show some wedges that were inserted into cracks in the sides. Once the glue had dried these were pared flush with the sides.

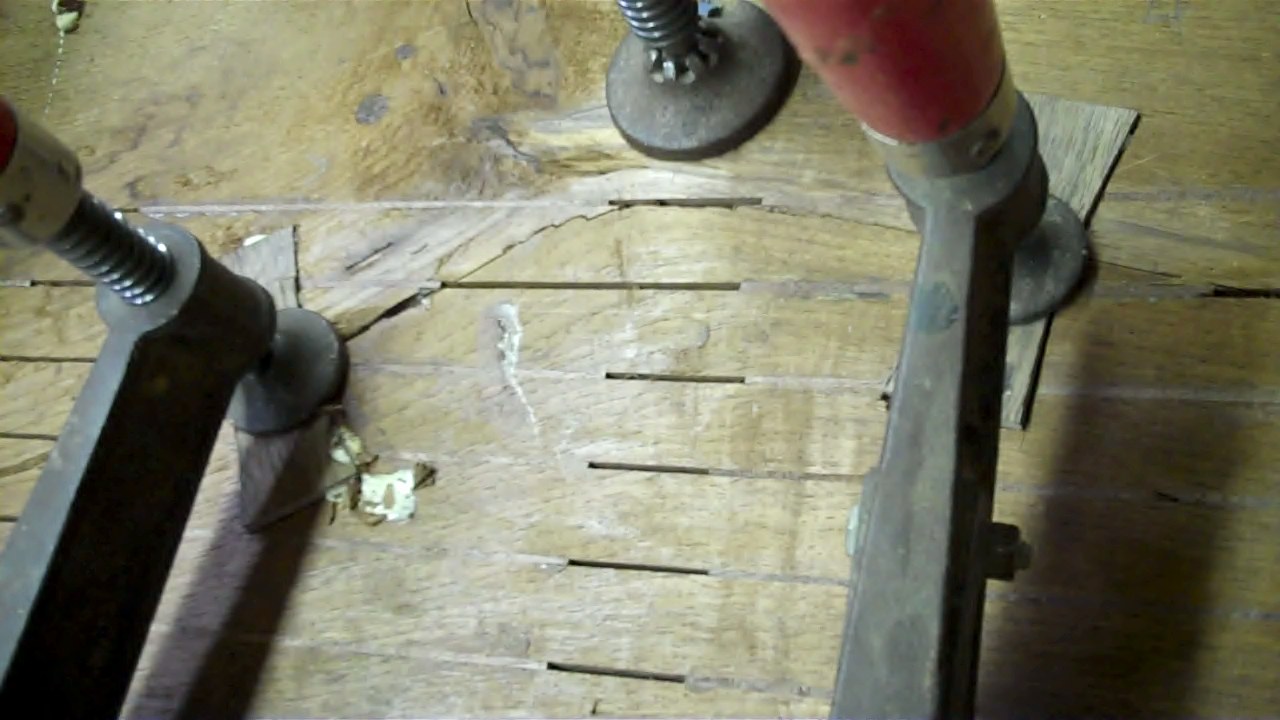
The feet were missing significant sections of the point on the bracket feet. The next two photos show the patching of these points with special three way clamps. Once the patches had dried they were shaped and sanded flush with the case.

On some of the drawers the cock beading had become loose. This is due to the drawer face shrinking making the cock bead on the edges longer than needed. Under pressure the glue gives out. I removed the beading where this had happened and cut it to fit properly. I then glued it back in place. The first photo below shows the beading removed and the second shows it being glued in place.

The runners on the drawer sides had been replaced through the years out of various materials. Sometimes Poplar and sometimes other wood, like Walnut. They were also wider than needed and had worn down through use. I removed the worn runners (pictured in the first photo) and replaced them with new Poplar which was cut to make the drawers open and close properly. All of the drawers can be seen being glued in the second photo.

The last three photos show the case with all of the repair work completed and during the finishing process.


Sunday, August 8, 2010

Federal Walnut Chest of Drawers (Ca. 1800) Part 1: Repairing the top

A current project of mine is a Walnut Federal Chest that was made sometime in the early 19th century or perhaps late 18th. The chest uses Black Walnut as a primary wood with the exception of the drawer dividers which are Cherry. The secondary wood (used for interior work) is all Poplar indicating that this piece was made in the south eastern United States. Additionally the drawers and top have inlay of Boxwood,Holly, or perhaps Satinwood. If it is Satinwood then that would be the only imported wood in the entire piece. The Style of the piece is considered Federal because of its American Manufacture, but the overall design follows the Hepplewhite style. The brass pulls appear to be original. All in all, this is a fine early American chest of drawers. below is a photo of the chest as it came to me (I had removed the top two pulls before I took the photo.)

The Major issue concerning the restoration of this chest was that the top had developed a large crack running almost the entire length of the main board (the top was made from two boards.) In addition, this board had cupped in different places so that the entire top was uneven. below is a photo of the top. The photo does not do justice to the extent of the warping!
To remedy this involved a series of rather invasive steps to make the top flat again and to stabilize and fill the crack. I decided to post this piece in two parts so that I could use this post to detail the repair of the top. the first step was to remove the top from the chest. the top was attached with two long sliding dovetails, each side dovetailing into the top. Unfortunately, someone in the past also nailed the top on, so I had to first dig out the nails and then pull the top off. The photo below shows the chest with the top removed.
On the underside of the top, a prior restorer had attached a piece of Maple to try to stabilize the top. It was only attached with screws so it was not doing much. The Maple board is seen in the photo below running vertically in the middle of the top. On either side you can see the mortises for the sliding dovetail joints mentioned above.
Once the top was removed the first step in the repair was to make a series of relief cuts in the underside. These cuts were made about 1 inch apart and run the entire length of the top. The blade was set a little shallow so that I did not cut through the top surface. This allowed the top to become flexible. One lucky aspect of this particular job was that the outer edges of the top had become loose over the years, so I removed the loose boards allowing me to make the cuts without being visible from the top.The cuts are seen in the photo below.

The next step was to flatten the top by clamping it down with stout flat boards onto a table saw. The underside was facing up. Once this was done long tapered wedges cut on the table saw were inserted into the relief cuts with glue. they could only be inserted where the top was not being clamped. the next two photos show this process.
After the glue had set the excess wood was hand planed off of the wedges so that they were flush with the top. After this was done, the next step was to insert butterfly patches into the underside along the crack to help keep the crack from expanding and contracting. The photo below shows the butterflies being glued in place.
After the butterflies were glued, they were planed flush with the underside of the top and the last step in the flattening was to insert wedges where there had been boards during the first round of gluing. I also took this opportunity to attach the pieces back onto the edges of the top. The next few photos show this process.

The butterflies in place and the filler wedges being glued.
More filler wedges on the right hand side of the board.
Filler wedges on the left hand side of the board.
The next two photos show the broken edges before they were glued back on. This photo shows how I had a nice place to make my cuts since this edge had fallen off. once the cuts were made. the edges could be reattached and there would be no visible sine from the outside that the top had been repaired!

The edge being glued back in place.

One last detail was to patch a missing portion of the back right edge of the top. The photo shows that detail.
Now that the repairs were completed, the top could be reunited with the case. The next two photos show the top being glued to the case. This time, no nails were used to attach the top!

With the top being glued the last step was to fill in the stabilized crack on the top. This was done with tapered wedges inserted into the crack with glue. Once the wedges were glued they were pared down flush to the top
The last two photos show the top with a couple coats of finish on the top and all of the repairs made. There were other repairs made to the case which I will detail in a separate post.

Monday, August 2, 2010

Tiemann Urology Medical Tools (Ca. 1886)

One of my current projects that I recently completed was a set of Medical tools made by G. Tiemann & C0. for use in Urology made sometime around 1886. The George Tiemann & Co. Medical Instrument Supply Company has been in business since 1826 and continues to make and sell Medical Instruments. In addition, they were one of the manufacturers of medical tools during the civil war and their tools were used on the battlefields. For a brief look at their history you can follow the link below to their website:

http://www.georgetiemann.com/layout.asp?include=aboutus


As for the dating of this particular set, I found a website which details the different labels used by the company during it's time. The label for this set appears below:

This label corresponds with labels used between 1886 and 1920. The site shows a early label and a late label and this one corresponds with the early one, so I would say that this set came from anywhere between 1886 and 1900. To view the different labels you can follow the link below:

http://www.braceface.com/medical/Articles/Tiemann_maker_marks.htm

The case for the instruments was what I was asked to restore. It is made of Mahogany throughout and over all was in ok shape, but the finish was very dirty and the case also required a patch. I also cleaned the liner and created a missing tab which I detail below. the last step was to make a key for the lock. The key blank was probably from around the same time period. below are some photos of the work.

The case as it came to me.
The case open displaying all of the tools.
Here is the case with the divider removed displaying more of the tools.
The first step was to mask off the liner and clean the finish with Mineral spirits. When the Mineral spirits dry they separate the wax and dirt from the finish and it turns a milky white color.
Here is a close up of the divider. The tab which was helpful in opening it was missing so I found some fabric that matched the existing fabric closely and fashioned a new one.
Here is the new tab in place.
The case needed some repair to the area where the divider inserts into the wood. It was probably opened wrong at one point and the wood was broken out. A tiny patch of Mahogany is being glued in place below. after the glue had set the patch was carved down and stained to match the wood.
After the case was cleaned new French Polish was added to the existing finish to bring back the shine.
Here are two photos of the completed restoration with the case open and closed. Note the 19th century key in the lock which did work the lock.