 The Major issue concerning the restoration of this chest was that the top had developed a large crack running almost the entire length of the main board (the top was made from two boards.) In addition, this board had cupped in different places so that the entire top was uneven. below is a photo of the top. The photo does not do justice to the extent of the warping!
 To remedy this involved a series of rather invasive steps to make the top flat again and to stabilize and fill the crack. I decided to post this piece in two parts so that I could use this post to detail the repair of the top. the first step was to remove the top from the chest. the top was attached with two long sliding dovetails, each side dovetailing into the top. Unfortunately, someone in the past also nailed the top on, so I had to first dig out the nails and then pull the top off. The photo below shows the chest with the top removed.
 On the underside of the top, a prior restorer had attached a piece of Maple to try to stabilize the top. It was only attached with screws so it was not doing much. The Maple board is seen in the photo below running vertically in the middle of the top. On either side you can see the mortises for the sliding dovetail joints mentioned above.
 Once the top was removed the first step in the repair was to make a series of relief cuts in the underside. These cuts were made about 1 inch apart and run the entire length of the top. The blade was set a little shallow so that I did not cut through the top surface. This allowed the top to become flexible. One lucky aspect of this particular job was that the outer edges of the top had become loose over the years, so I removed the loose boards allowing me to make the cuts without being visible from the top.The cuts are seen in the photo below.
 The next step was to flatten the top by clamping it down with stout flat boards onto a table saw. The underside was facing up. Once this was done long tapered wedges cut on the table saw were inserted into the relief cuts with glue. they could only be inserted where the top was not being clamped. the next two photos show this process.
 After the glue had set the excess wood was hand planed off of the wedges so that they were flush with the top. After this was done, the next step was to insert butterfly patches into the underside along the crack to help keep the crack from expanding and contracting. The photo below shows the butterflies being glued in place.
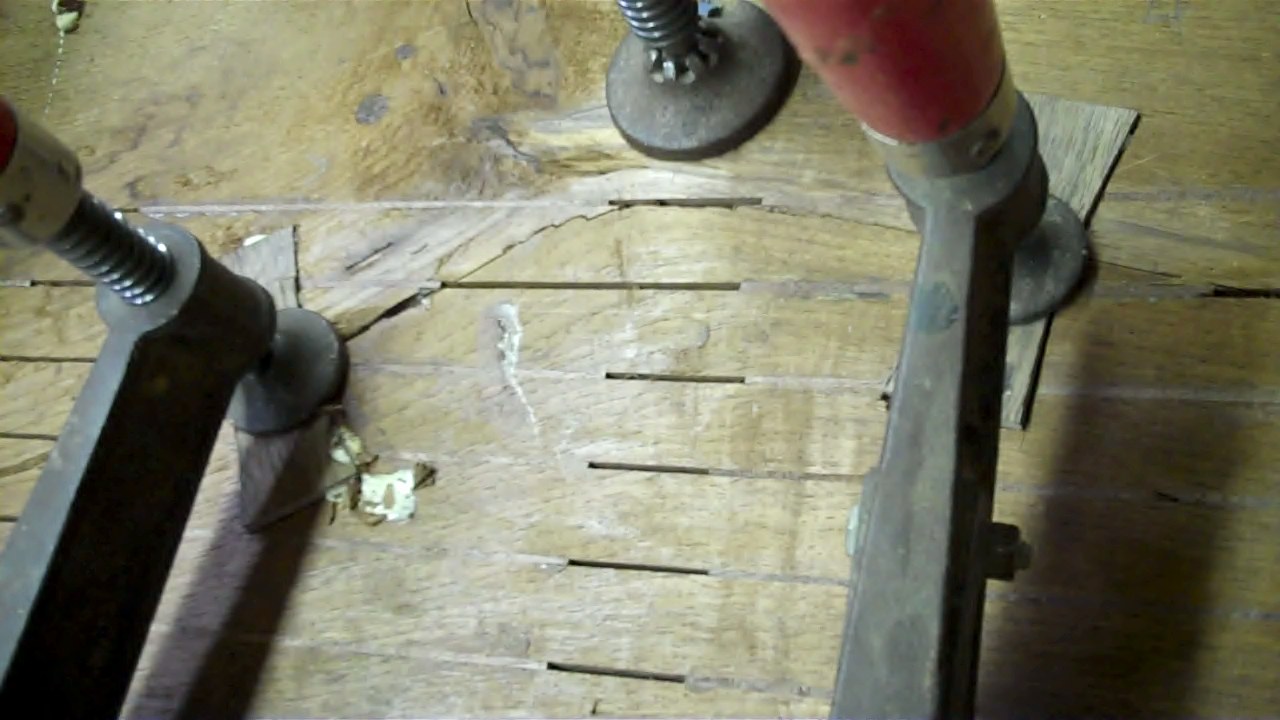 After the butterflies were glued, they were planed flush with the underside of the top and the last step in the flattening was to insert wedges where there had been boards during the first round of gluing. I also took this opportunity to attach the pieces back onto the edges of the top. The next few photos show this process.
The butterflies in place and the filler wedges being glued.
 More filler wedges on the right hand side of the board.
 Filler wedges on the left hand side of the board.
 The next two photos show the broken edges before they were glued back on. This photo shows how I had a nice place to make my cuts since this edge had fallen off. once the cuts were made. the edges could be reattached and there would be no visible sine from the outside that the top had been repaired!
 The edge being glued back in place.
One last detail was to patch a missing portion of the back right edge of the top. The photo shows that detail.
 Now that the repairs were completed, the top could be reunited with the case. The next two photos show the top being glued to the case. This time, no nails were used to attach the top!
 With the top being glued the last step was to fill in the stabilized crack on the top. This was done with tapered wedges inserted into the crack with glue. Once the wedges were glued they were pared down flush to the top
 The last two photos show the top with a couple coats of finish on the top and all of the repairs made. There were other repairs made to the case which I will detail in a separate post.

Wow! Nice job.
ReplyDeleteWow…outstanding service and products to meet our office needs. I Love all and the colors you choose are perfect. I want this furniture for my new house. Thanks a lot for sharing
ReplyDeleteDressing Table In Chennai With Prices